Health/Lifestyle: Add a bit of T-H-C into your E-A-Ts With Infused Coconut Oil
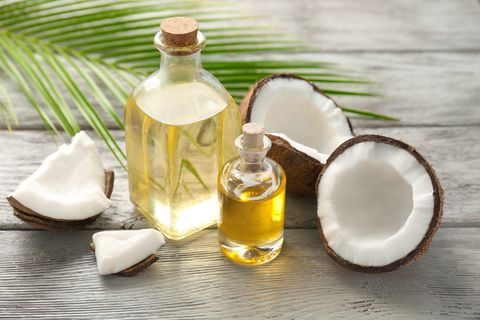
Are you interested in making your own edibles, or having an all natural pain relief balm? Well, the first step is infusing an oil. While you could potentially use butter, olive oil, or any medium with a good amount of fat in it, the popular consensus is that coconut oil is an ideal and easy to work with medium to infuse, and thus this recipe will focus on coconut oil infusion specifically.
We here at Yen Won Industries are strong proponents of the benefits of THC and CBD in both medicinal and recreational usage and this is a consumption method that I've had great enjoyment in personally through topical and ingested relief. I've found success in making all sorts of baked goods with coconut oil and through some experimentation have even had infused meals such as a red onion jam hamburger with a side of potatoes.
Cannabis infused coconut oil is a versatile product that you can eat on its own, or turn any recipe into an edible. If you’re not looking to medicate through consumption, there’s no worries as you can use your coconut oil as a topical pain relief balm. I’ll be going into further detail of its uses in the “Applications” section below.
You will need:
1 Crock Pot OR 1 Large Pot
1 and ½ cup measuring cups
Strainer
Foil or parchment paper
Glass baking pan
Glass container (for final storage)
An herb grinder
14 grams - 28 grams fresh cannabis flower (ground)
2 cups worth of Coconut Oil

What will be covered:
Uses of THC Infused Coconut Oil
Where to source ingredients from
Step by step process of infusing coconut oil
Measuring Potency
Storage/safety warnings

As I mentioned briefly above, infused coconut oil has a diverse range of uses. On the consumption side of things, it may be used in any recipe as a substitute for regular cooking oil/butter to make medicated dishes or infused hot drinks. Some people choose to fill pill capsules with the oil to have a discreet method of medicating while travelling or to have easily available pre-measured doses on hand. If you’re looking to simply enjoy the pain-relief benefits of cannabis without the “high”, fear not, as infused coconut oil is easily absorbed through the skin and can be an effective treatment for joint pains, arthritis, sore muscles, or nerve pains. All you need to do is melt a spoonful and rub in a liberal amount to the area in pain for quick relief.
[PREPARATION]
Step One: Sourcing your ingredients/ Costs
If you’re in one of the 11 states that have legalized recreational use of Cannabis for those 21 and up, sourcing your cannabis can be as simple as calling up a local delivery service who will bring the flower of your choice from a starting point of $100-$200 depending on your budget and choice of cannabis flower strain. If your state has only legalized Medical Marijuana, if you are enrolled in its medical program, you would be able to visit your nearest dispensary or call a delivery service to obtain your cannabis. Alternatively, if you grow your own or know someone who does, this is acceptable as well, but your potency would be more of an estimate as you wouldn’t have access to the lab tested results for THC levels that come with dispensary marijuana.

Step 2: Preparing your Cannabis Flower for consumption
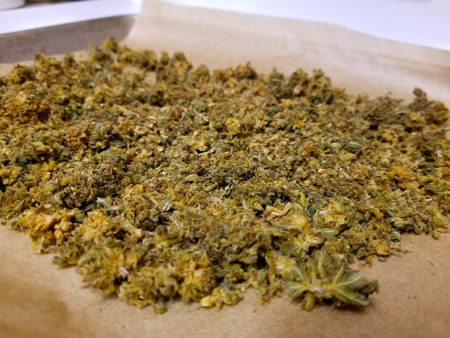
Now, raw cannabis flower can not be eaten and digested properly by humans in its current state and so you must go through a process called decarboxylation or “decarbing” your cannabis. Simply put, you apply low levels of heat to “bake” your raw cannabis and through this heating, it activates the compounds in cannabis that are digestible so that it takes effect. Without this step, you will simply be left with cannabis flavored coconut oil that has little to no effects whatsoever.
You can do this by placing tin foil or parchment paper in a small glass baking pan.
Grind up your raw cannabis.
Pour your ground cannabis into the foil/parchment paper and spread it evenly in your pan.
Place in an oven at 250 degrees for about 20-30 minutes. Take care to use low heat to avoid burning as this would waste all your ground cannabis.
Once this is over, your cannabis should have turned a light to medium-brown color but shouldn’t be burnt.
*CONSIDERATION: This step is often the most odorous step of the process, so cook with caution if you do not have a private kitchen.
Ground cannabis before decarboxylation After decarboxylation

[INFUSION]
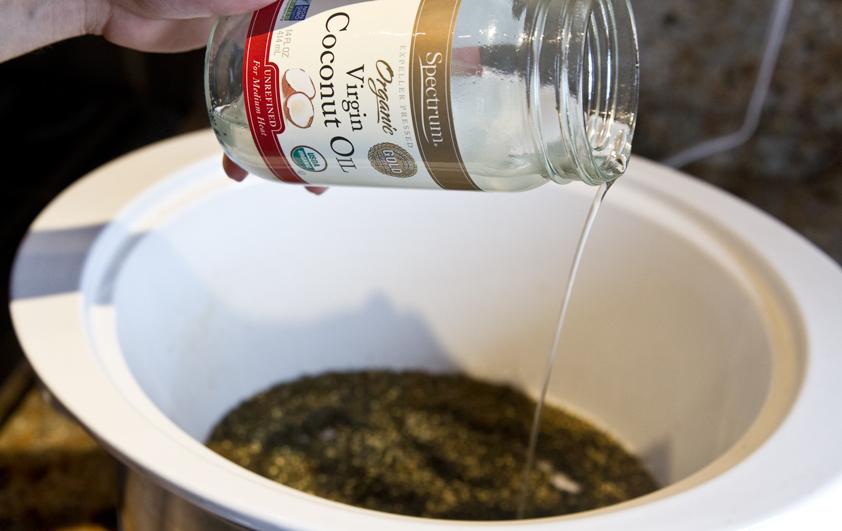
Step 3: Putting it all together
Combine two cups of coconut oil and your decarbed cannabis in your pot or slow cooker, and heat the two together on low or warm for several hours. This allows for additional decarboxylation without scorching, which would destroy your active ingredients and ruin your infusion. This step can be done with a couple different methods depending on your time constraints and equipment available. These methods are: in a slow cooker on low for 4-6 hours, stirring occasionally, in a pot on low for at least 5 hours, stirring occasionally, or in a saucepan on low for at least 3 hours, stirring frequently. Whichever method is used, always add a small amount of water to the mixture to help avoid burning. Note: whatever method you choose, the temperature of the oil should not exceed 245°F.
Step 4: Strain
Once you’ve finished cooking your oil, pour it through a strainer into your glass dish for final storage. You may need to strain for a few passes as there will be plant matter that makes it through the first pour. While having plant matter in your final product isn’t bad per say, your goal is to remove as much of the solid bits as possible while retaining purely the infused coconut oil.
The coconut oil should have a brown to dark brown color at this time and once you have finished straining, place inside of your fridge to cool and solidify.
Step 5: Final Processing
Once everything has solidified you’ll want to take a look at your nearly finished result which will be a light green to a brown color depending on the levels of chlorophyll in your cannabis. As a result of oil and water separating, you may find that there’s a strange layer on top of your oil. There’s no need for concern, and you can simply scrape off this layer with a spoon, leaving only the solidified coconut oil. With this, your infusion is complete and ready for any use!

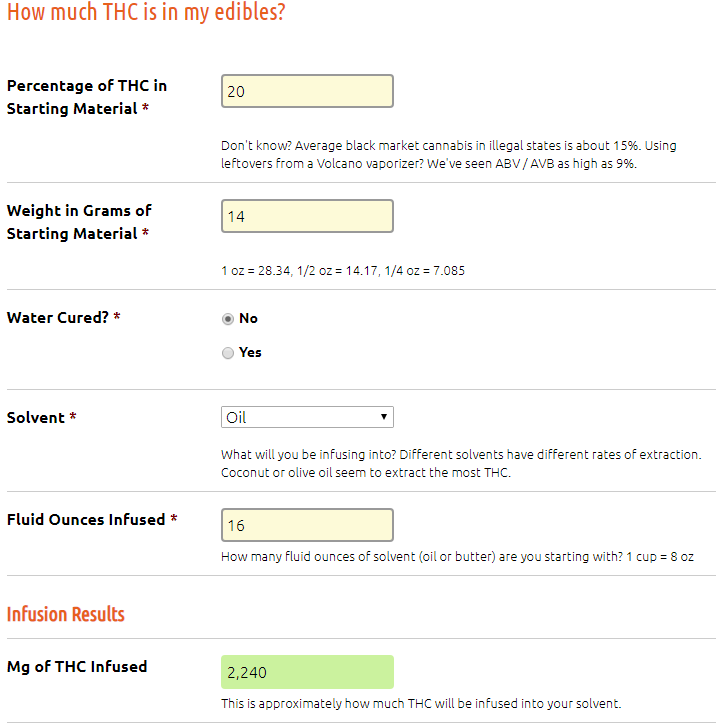
Measuring Potency
In order to have a good estimate of the potency of your final result, you’ll need to know the percentage of THC in your starting material, or how potent your raw cannabis was. Using an online potency calculator, you can then punch in how much cannabis you used, your type of medium (oil, butter, etc), and how much oil you used in order to get a relatively accurate measure of how strong your infused oil is. I’ve found that the calculator on “volcanotips.com” is reliable, but any of the top search results will do just fine as long as you punch in the correct measurements.
Storage/Cautionary Measures
Storage of your finished oil is relatively simple as coconut oil is a generally stable substance and can be stored at room temperature with no issues in a liquid or solid form. I personally prefer to keep it in the fridge for protection against mold during long-term storage, but if you intend to use it in a relatively timely manner, a cool, dry place such as a cabinet should be more than adequate. However, as this is a concentrated form of cannabis, safety must be taken into consideration when choosing storage. If there are children in your household, please make sure to store it in a location out of their reach or accessibility as they may be tempted to consume your oil and it could make them extremely sick. If you have pets, make sure your storage container is not out in the open, or openable by them as THC at these levels can be extremely poisonous for most household pets. With this being said, as long as you store your oil in a safe place with consistent conditions, you’ll be able to use it at your leisure for up to a year or more! Enjoy your creations responsibly, and always remember: you can always eat more, but you can’t eat less. Bong Appétit!
Comments
Post a Comment